Personal vehicles and work vehicles
Your starter car is a personal vehicle stored in a public garage. The arrival notification tells you which garage and sets GPS there. Open the full map from ESC, Overview, Explore the map to find garages and impound lots by their marker names.
- Personal vehicles belong to your character and use garages for storage. Ordinary public garages share storage: park at one and collect at another suitable public garage. Cars, aircraft and boats still need the correct type of garage.
- Company freight rigs and the mechanic work flatbed come from your class app or workplace. Follow those job controls to collect and return them.
- Owned trucking rigs use the Truckmania Yard. It accepts the supported work trucks and keeps its storage separate from public garages. Job, organisation and property garages may also have their own access and storage rules.
Taking your vehicle out of a garage
- Walk into the garage marker on foot. When E - Open Garage appears, press E.
- Select your vehicle with the mouse or Up / Down arrows. Check its name, plate and Body, Engine and Fuel percentages. Stored at tells you when it is parked at another garage in the public network.
- Choose Take Out, press Enter or double-click the vehicle row. Keep the vehicle spawn area clear; another vehicle blocking it prevents collection.
- The vehicle appears nearby and you receive its keys. You stay on foot; use L to unlock it, then enter. Press ESC to close the garage panel when browsing.
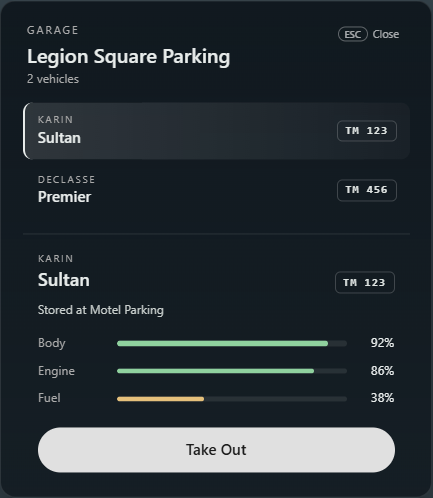
Parking and storing a vehicle
- Drive your vehicle into a suitable garage drop-off marker. Move into the marked area until E - Store Vehicle appears.
- Have passengers get out, then press E to store the vehicle. Wait for Vehicle Stored before leaving.
- To collect it again, walk into the garage marker on foot and press E. Public storage is shared; a vehicle stored at the Truckmania Yard or another separate garage is collected there.
Lost vehicles and impound collection
- Vehicles still out in the world are omitted from the garage list. Return to the vehicle and drive it back to store it.
- A vehicle marked Lost is out of storage but no longer in the world. Suitable public garages and impound lots can offer recovery. Select it and read the Recover fee before collecting; the charge comes from your bank.
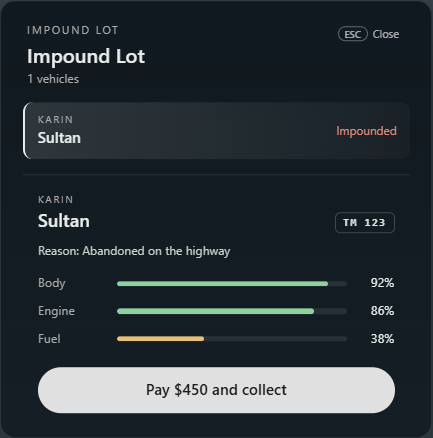
- An impounded vehicle must be collected at a suitable impound lot. Walk to its marker and press E when E - Open Impound appears. Check the reason and fee, then use Pay and collect when available.
- A timed hold shows how long remains; a held vehicle cannot be collected until released. Adding more bank money does not remove a hold.
Keys and everyday vehicle controls
- L toggles locks on a vehicle you have access to. Stand close to it when locking or unlocking from outside.
- In the vehicle, press K to open the vehicle panel or cycle through available job tabs. On the Vehicle tab, use the arrows to select Engine, Locks, Lights or an available door, then Enter to operate it. Back closes the panel.
- Vehicle-panel controls require the driver seat and keys. Turn the engine off when leaving the vehicle and lock it after getting out.
- These are default shortcuts. Change your saved server keybinds under ESC, Settings, Key Bindings, FiveM.
Refuelling at a station
- Check fuel on the driving HUD and plan a stop at a fuel-pump marker before running low. Keep enough money in your bank to pay.
- Drive the vehicle beside a station pump, turn off the engine and get out. Nobody may remain in the driver seat. Use the vehicle you just drove and keep it close to the pump.
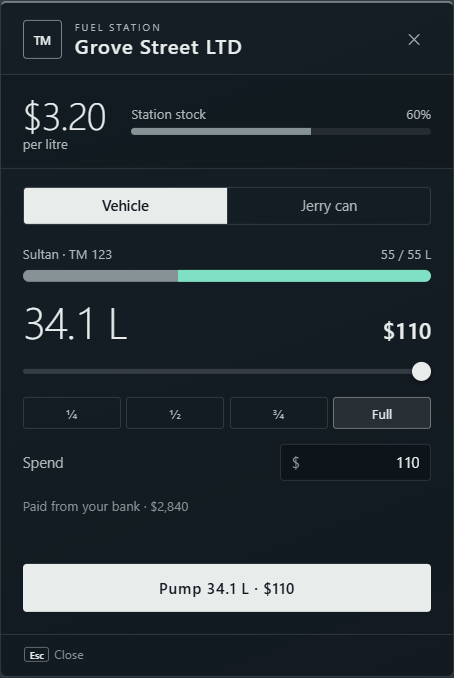
- Hold Left Alt at the pump and choose Fuel pump. A panel opens at the side of the screen with the station price per litre, its stock and your tank.
- The panel starts on a full tank, or as much as your bank balance covers. To pump less, drag the slider, pick ¼, ½ or ¾, or type a dollar amount under Spend. The button shows the litres and the bank cost; click it to start.
- Stay at the pump while the litres and dollars count up. It stops by itself when the amount is in; click Stop to finish sooner. Stopping early charges only for fuel actually pumped.
Jerry cans, damage and roadside help
- At a pump, hold Left Alt, choose Fuel pump and open the Jerry can tab to buy one ($150). A new can comes full and holds 20 litres; you need bank funds and inventory room. To refill a partly empty can, hold it in your hands first, then use the same tab. Refills use the station price and stock.
- With a non-empty jerry can equipped, stand beside the vehicle, hold Left Alt and choose Pour jerry can. Get everyone out of the driver seat first. Stay beside the vehicle until the pour finishes.
- Body, Engine and Fuel describe different things. Refuelling does not repair damage. A damaged fuel tank can leak; repairing it helps avoid losing fuel.
- Use an ordinary Repair Kit at the engine bay for engine and fuel-tank damage, or a Tire Kit beside the affected wheel for a flat or missing tyre. Advanced Repair Kits require an on-duty mechanic.
- For roadside help, sit in the driver seat, press K and select Assistance. It shows the most the call can cost; press Enter twice to request help. Read the service messages and keep bank funds available.